A: Manually record the SSH key by running: ssh-keyscan -t rsa domain.com /.ssh/knownhosts. Q: How can I have Git remember the passphrase for my key on Windows? A: Run the following command included in Git for Windows to start up the ssh-agent process in Powershell or the Windows Command Prompt.
-->This article describes ways to generate and use secure shell (SSH) keys on a Windows computer to create and connect to a Linux virtual machine (VM) in Azure. To use SSH keys from a Linux or macOS client, see the quick or detailed guidance.
Overview of SSH and keys
SSH is an encrypted connection protocol that allows secure sign-ins over unsecured connections. SSH is the default connection protocol for Linux VMs hosted in Azure. Although SSH itself provides an encrypted connection, using passwords with SSH connections still leaves the VM vulnerable to brute-force attacks or guessing of passwords. A more secure and preferred method of connecting to a VM using SSH is by using a public-private key pair, also known as SSH keys.
The public key is placed on your Linux VM, or any other service that you wish to use with public-key cryptography.
The private key remains on your local system. Protect this private key. Do not share it.
When you use an SSH client to connect to your Linux VM (which has the public key), the remote VM tests the client to make sure it possesses the private key. If the client has the private key, it's granted access to the VM.
Depending on your organization's security policies, you can reuse a single public-private key pair to access multiple Azure VMs and services. You do not need a separate pair of keys for each VM or service you wish to access.
Your public key can be shared with anyone, but only you (or your local security infrastructure) should possess your private key.
Supported SSH key formats
Azure currently supports SSH protocol 2 (SSH-2) RSA public-private key pairs with a minimum length of 2048 bits. Other key formats such as ED25519 and ECDSA are not supported.
Windows packages and SSH clients
You connect to and manage Linux VMs in Azure using an SSH client. Computers running Linux or macOS usually have a suite of SSH commands to generate and manage SSH keys and to make SSH connections.
Windows computers do not always have comparable SSH commands installed. Recent versions of Windows 10 provide OpenSSH client commands to create and manage SSH keys and make SSH connections from a command prompt. Recent Windows 10 versions also include the Windows Subsystem for Linux to run and access utilities such as an SSH client natively within a Bash shell.
Other common Windows SSH clients you can install locally are included in the following packages:
You can also use the SSH utilities available in Bash in the Azure Cloud Shell.
- Access Cloud Shell in your web browser at https://shell.azure.com or in the Azure portal.
- Access Cloud Shell as a terminal from within Visual Studio Code by installing the Azure Account extension.
Create an SSH key pair
The following sections describe two options to create an SSH key pair on Windows. You can use a shell command (ssh-keygen) or a GUI tool (PuTTYgen). Also note, when using Powershell to create a key, upload the public key as ssh.com(SECSH) format. When using CLI, convert the key into OpenSSH format prior to uploading.
Create SSH keys with ssh-keygen
If you run a command shell on Windows that supports SSH client tools (or you use Azure Cloud Shell), create an SSH key pair using the ssh-keygen command. Type the following command, and answer the prompts. If an SSH key pair exists in the chosen location, those files are overwritten.
For more background and information, see the quick or detailed steps to create SSH keys using ssh-keygen.
Create SSH keys with PuTTYgen
If you prefer to use a GUI-based tool to create SSH keys, you can use the PuTTYgen key generator, included with the PuTTY download package.
To create an SSH RSA key pair with PuTTYgen:
Start PuTTYgen.
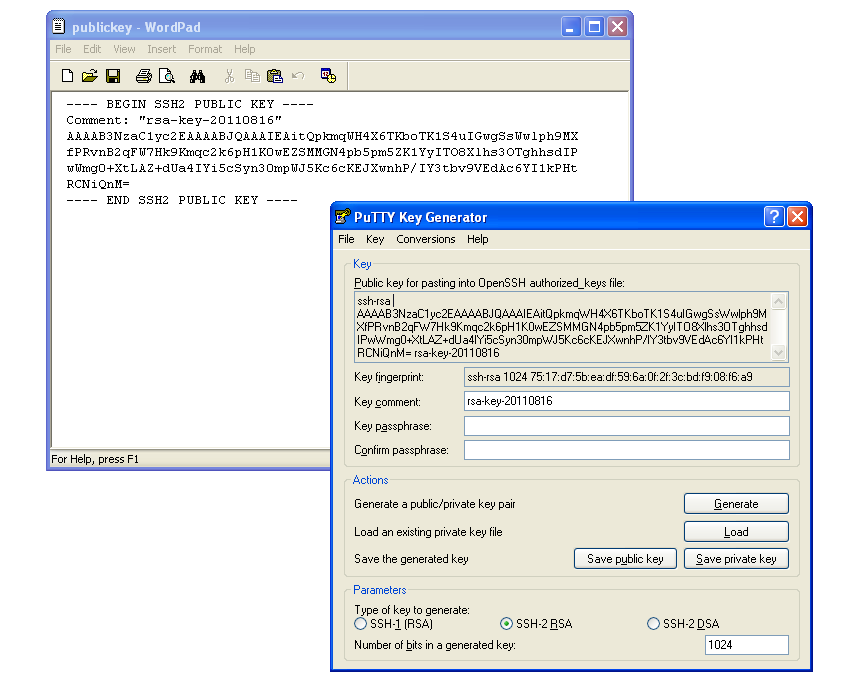
Click Generate. By default PuTTYgen generates a 2048-bit SSH-2 RSA key.
Move the mouse around in the blank area to provide randomness for the key.
After the public key is generated, optionally enter and confirm a passphrase. You will be prompted for the passphrase when you authenticate to the VM with your private SSH key. Without a passphrase, if someone obtains your private key, they can sign in to any VM or service that uses that key. We recommend you create a passphrase. However, if you forget the passphrase, there is no way to recover it.
The public key is displayed at the top of the window. You can copy this entire public key and then paste it into the Azure portal or an Azure Resource Manager template when you create a Linux VM. You can also select Save public key to save a copy to your computer:
Optionally, to save the private key in PuTTy private key format (.ppk file), select Save private key. You will need the .ppk file later to use PuTTY to make an SSH connection to the VM.
If you want to save the private key in the OpenSSH format, the private key format used by many SSH clients, select Conversions > Export OpenSSH key.
Provide an SSH public key when deploying a VM
To create a Linux VM that uses SSH keys for authentication, provide your SSH public key when creating the VM using the Azure portal or other methods.
The following example shows how you would copy and paste this public key into the Azure portal when you create a Linux VM. The public key is typically then stored in the ~/.ssh/authorized_key directory on your new VM.
Connect to your VM
One way to make an SSH connection to your Linux VM from Windows is to use an SSH client. This is the preferred method if you have an SSH client installed on your Windows system, or if you use the SSH tools in Bash in Azure Cloud Shell. If you prefer a GUI-based tool, you can connect with PuTTY.
Use an SSH client
With the public key deployed on your Azure VM, and the private key on your local system, SSH to your VM using the IP address or DNS name of your VM. Replace azureuser and myvm.westus.cloudapp.azure.com in the following command with the administrator user name and the fully qualified domain name (or IP address):
If you configured a passphrase when you created your key pair, enter the passphrase when prompted during the sign-in process.
If the VM is using the just-in-time access policy, you need to request access before you can connect to the VM. For more information about the just-in-time policy, see Manage virtual machine access using the just in time policy.
Connect with PuTTY
If you installed the PuTTY download package and previously generated a PuTTY private key (.ppk) file, you can connect to a Linux VM with PuTTY.
Start PuTTy.
Fill in the host name or IP address of your VM from the Azure portal:
Select the Connection > SSH > Auth category. Browse to and select your PuTTY private key (.ppk file):
Click Open to connect to your VM.
Next steps
For detailed steps, options, and advanced examples of working with SSH keys, see Detailed steps to create SSH key pairs.
You can also use PowerShell in Azure Cloud Shell to generate SSH keys and make SSH connections to Linux VMs. See the PowerShell quickstart.
If you have difficulty using SSH to connect to your Linux VMs, see Troubleshoot SSH connections to an Azure Linux VM.
Azure Repos Azure DevOps Server 2019 TFS 2018 TFS 2017 TFS 2015 Update 3
Connect to your Git repos through SSH on macOS, Linux, or Windows to securely connect using HTTPS authentication. On Windows, we recommended the use of Git Credential Managers or Personal Access Tokens.
Important
SSH URLs have changed, but old SSH URLs will continue to work. If you have already set up SSH, you should update your remote URLs to the new format:
- Verify which remotes are using SSH by running
git remote -vin your Git client. - Visit your repository on the web and select the Clone button in the upper right.
- Select SSH and copy the new SSH URL.
- In your Git client, run:
git remote set-url <remote name, e.g. origin> <new SSH URL>. Alternatively, in Visual Studio, go to Repository Settings, and edit your remotes.
Note
As of Visual Studio 2017, SSH can be used to connect to Git repos.
How SSH key authentication works
SSH public key authentication works with an asymmetric pair of generated encryption keys. The public key is shared with Azure DevOps and used to verify the initial ssh connection. The private key is kept safe and secure on your system.
Set up SSH key authentication
The following steps cover configuration of SSH key authentication on the following platforms:
- Linux
- macOS running at least Leopard (10.5)
- Windows systems running Git for Windows
Configure SSH using the command line. bash is the common shell on Linux and macOS and the Git for Windows installation adds a shortcut to Git Bash in the Start menu.Other shell environments will work, but are not covered in this article.
Step 1: Create your SSH keys
Note
If you have already created SSH keys on your system, skip this step and go to configuring SSH keys.
The commands here will let you create new default SSH keys, overwriting existing default keys. Before continuing, check your~/.ssh folder (for example, /home/jamal/.ssh or C:Usersjamal.ssh) and look for the following files:
Continue on to if this was successful. Copying Public Key ManuallyIf you do not have password-based SSH access to your server available, you will have to complete the above process manually.We will manually append the content of your idrsa.pub file to the /.ssh/authorizedkeys file on your remote machine.To display the content of your idrsa.pub key, type this into your local computer:. Linux ssh-keygen rsa 4096. Output username@ 203.0.113.1's password:After entering your password, the content of your idrsa.pub key will be copied to the end of the authorizedkeys file of the remote user’s account.
- id_rsa
- id_rsa.pub
If these files exist, then you have already created SSH keys. You can overwrite the keys with the following commands, or skip this step and go to configuring SSH keys to reuse these keys.
Create your SSH keys with the ssh-keygen command from the bash prompt. This command will create a 2048-bit RSA key for use with SSH. You can give a passphrasefor your private key when prompted—this passphrase provides another layer of security for your private key.If you give a passphrase, be sure to configure the SSH agent to cache your passphrase so you don't have to enter it every time you connect.
This command produces the two keys needed for SSH authentication: your private key ( id_rsa ) and the public key ( id_rsa.pub ). It is important to never share the contents of your private key. If the private key iscompromised, attackers can use it to trick servers into thinking the connection is coming from you.
Step 2: Add the public key to Azure DevOps Services/TFS
Associate the public key generated in the previous step with your user ID.
Open your security settings by browsing to the web portal and selecting your avatar in the upper right of theuser interface. Select Security in the menu that appears.
Select SSH public keys, and then select + New Key.
Copy the contents of the public key (for example, id_rsa.pub) that you generated into the Public Key Data field.
Important
Avoid adding whitespace or new lines into the Key Data field, as they can cause Azure DevOps Services to use an invalid public key. When pasting in the key, a newline often is added at the end. Be sure to remove this newline if it occurs.
Give the key a useful description (this description will be displayed on the SSH public keys page for your profile) so that you can remember it later. Select Save to store the public key. Once saved, you cannot change the key. You can delete the key or create a new entry for another key. There are no restrictions on how many keys you can add to your user profile.
Step 3: Clone the Git repository with SSH
Note
To connect with SSH from an existing cloned repo, see updating your remotes to SSH.
Copy the SSH clone URL from the web portal. In this example, the SSL clone URL is for a repo in an organization named fabrikam-fiber, as indicated by the first part of the URL after
dev.azure.com.Note
Project URLs have changed with the release of Azure DevOps Services and now have the format
dev.azure.com/{your organization}/{your project}, but you can still use the existingvisualstudio.comformat. For more information, see VSTS is now Azure DevOps Services.Run
git clonefrom the command prompt.
SSH may display the server's SSH fingerprint and ask you to verify it.
For cloud-hosted Azure DevOps Services, where clone URLs contain either ssh.dev.azure.com or vs-ssh.visualstudio.com, the fingerprint should match one of the following formats:
- MD5:
97:70:33:82:fd:29:3a:73:39:af:6a:07:ad:f8:80:49(RSA) - SHA256:
SHA256:ohD8VZEXGWo6Ez8GSEJQ9WpafgLFsOfLOtGGQCQo6Og(RSA)These fingerprints are also listed in the SSH public keys page.
For self-hosted instances of Azure DevOps Server, you should verify that the displayed fingerprint matches one of the fingerprints in the SSH public keys page.
SSH displays this fingerprint when it connects to an unknown host to protect you from man-in-the-middle attacks.Once you accept the host's fingerprint, SSH will not prompt you again unless the fingerprint changes.
When you are asked if you want to continue connecting, type yes. Git will clone the repo and set up the origin remote to connect with SSH for future Git commands.
Tip
Avoid trouble: Windows users will need to run a command to have Git reuse their SSH key passphrase.
Questions and troubleshooting
Q: After running git clone, I get the following error. What should I do?
Host key verification failed.fatal: Could not read from remote repository.
Create Ssh Key Git Windows
A: Manually record the SSH key by running:ssh-keyscan -t rsa domain.com >> ~/.ssh/known_hosts
 After it is installed you can just go ahead and generate your public key if you want to put in on a server. You generate it by running: ssh-keygen -t rsa After that you can just can just press enter, it will automatically assign a name for the key (example: idrsa.pub). To generate the public/private key pair, enter this in the Command Prompt: ssh-keygen At the first prompt, “Enter file in which to save the key,” press Enter to save it in the default location. Sep 26, 2019 To generate an SSH key with PuTTYgen, follow these steps: Open the PuTTYgen program. For Type of key to generate, select SSH-2 RSA. Click the Generate button. Move your mouse in the area below the progress bar. When the progress bar is full, PuTTYgen generates your key pair.
Q: How can I have Git remember the passphrase for my key on Windows?
A: Run the following command included in Git for Windows to start up the ssh-agent process in Powershell or the Windows Command Prompt. ssh-agent will cacheyour passphrase so you don't have to provide it every time you connect to your repo.
If you're using the Bash shell (including Git Bash), start ssh-agent with:
Q: I use PuTTY as my SSH client and generated my keys with PuTTYgen. Can I use these keys with Azure DevOps Services?
Generate Ssh Key Windows Git Cmd
A: Yes. Load the private key with PuTTYgen, go to Conversions menu and select Export OpenSSH key.Save the private key file and then follow the steps to set up non-default keys.Copy your public key directly from the PuTTYgen window and paste into the Key Data field in your security settings.
Q: How can I verify that the public key I uploaded is the same key as I have locally?
A: You can verify the fingerprint of the public key uploaded with the one displayed in your profile through the following ssh-keygen command run against your public key usingthe bash command line. You will need to change the path and the public key filename if you are not using the defaults.
You can then compare the MD5 signature to the one in your profile. This check is useful if you have connection problems or have concerns about incorrectlypasting in the public key into the Key Data field when adding the key to Azure DevOps Services.
Q: How can I start using SSH in a repository where I am currently using HTTPS?
A: You'll need to update the origin remote in Git to change over from a HTTPS to SSH URL. Once you have the SSH clone URL, run the following command:
You can now run any Git command that connects to origin.
Q: I'm using Git LFS with Azure DevOps Services and I get errors when pulling files tracked by Git LFS.

A: Azure DevOps Services currently doesn't support LFS over SSH. Use HTTPS to connect to repos with Git LFS tracked files.
Q: How can I use a non default key location, i.e. not ~/.ssh/id_rsa and ~/.ssh/id_rsa.pub?
A: To use keys created with ssh-keygen in a different place than the default, you do two things:
- The keys must be in a folder that only you can read or edit. If the folder has wider permissions, SSH will not use the keys.
- You must let SSH know the location of the keys. You make SSH aware of keys through the
ssh-addcommand, providing the full path to the private key.
On Windows, before running ssh-add, you will need to run the following command from included in Git for Windows:
This command runs in both Powershell and the Command Prompt. If you are using Git Bash, the command you need to use is:
You can find ssh-add as part of the Git for Windows distribution and also run it in any shell environment on Windows.
On macOS and Linux you also must have ssh-agent running before running ssh-add, but the command environment on these platforms usuallytakes care of starting ssh-agent for you.
Q: I have multiple SSH keys. How do I use different SSH keys for different SSH servers or repos?
A: Generally, if you configure multiple keys for an SSH client and connect to an SSH server, the client can try the keys one at a time until the server accepts one.
However, this doesn't work with Azure DevOps for technical reasons related to the SSH protocol and how our Git SSH URLs are structured. Azure DevOps will blindly accept the first key that the client provides during authentication. If that key is invalid for the requested repo, the request will fail with the following error:
For Azure DevOps, you'll need to configure SSH to explicitly use a specific key file. One way to do this to edit your ~/.ssh/config file (for example, /home/jamal/.ssh or C:Usersjamal.ssh) as follows:
Q: What notifications may I receive about my SSH keys?
A: Whenever you register a new SSH Key with Azure DevOps Services, you will receive an email notification informing you that a new SSH key has been added to your account.
Q: What do I do if I believe that someone other than me is adding SSH keys on my account?
A: If you receive a notification of an SSH key being registered and you did not manually upload it to the service, your credentials may have been compromised.
The next step would be to investigate whether or not your password has been compromised. Changing your password is always a good first step to defend against this attack vector. If you’re an Azure Active Directory user, talk with your administrator to check if your account was used from an unknown source/location.